ProtoTech releases a new version (v 2.2.19044.184) of 3D Measure Up with Command Prompt Feature
ProtoTech Solutions has released its latest version (v 2.2.19044.184) of 3D Measure Up with new exciting features. ProtoTech’s 3D Measure Up application allows the users to execute 3D Measure Up from the command prompt and pass input parameters (e.g. Input file name, a Scanner unit, Viewing unit, Girth type, Output folder path, calibration value and unit etc)
Features of this release-
- Command Prompt Feature for 3D Measure UP :
Implemented Command Prompt Feature for 3D Measure UP. The user can execute 3D Measure Up from the command prompt and pass input parameters (e.g. Input file name, a Scanner unit, Viewing unit, Girth type, Output folder path, calibration value and unit etc) and the final output saved as CSV and HTML.
Currently available options/parameters:
/F Full path of OBJ/STL file along with the extension
/OP Full path of the folder where output files are to be placed
/SU Scanner unit in which OBJ/STL file is scanned.
/VU Unit in which OBJ/STL file is to be viewed.
/S Type of saved output. [CSV/HTML/OBJ/ALL].
/G Type of girth. [RubberBand/TightFit]
/CH Calibrated height of model.
/CU Calibration unit.
Help/Documentation:
The user just needs to type “3DMeasureUp help” to get the list of available options.

Fig 1: List of all available options (2.2.19044.184)
Where to use:
This is very useful in scenarios where the user wants to use features of 3D Measure Up:
– In the background without anybody noticing it.
– From within his own application code.
– Run a batch file to get measurements of multiple files at a single go.
Limitations:
As it is an automatic process. All features involving GUI interactions cannot be supported. e.g.
– Manual alignment of the model.
– On-surface measurements and direct measurements.
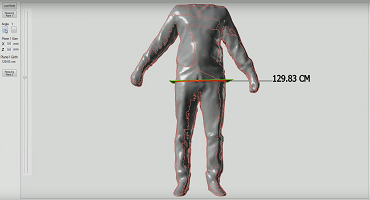
- Allow the user to add dimension between any two planes
Now user can add dimension between any two parallel ‘measure body planes’
How to insert a plane:
- Keeping CTRL key pressed, double click on the 1st plane.
- Keeping CTRL key pressed, double click again on the 2nd plane.
A linear dimension will be inserted between these two planes if no other dimension existed between these to planes earlier.

Fig 2: Linear dimensions between some common planes
- Allow the user to move the dimensions in GUI.
Now user can just move the dimension just by dragging the dimension text (or leader lines of dimension) to a new location.
About ProtoTech Solutions
ProtoTech is a custom software solutions company with skills in
- Development of 2D/3D based Engineering applications.
- AR/VR App Development.
- 3D Desktop/Mobile/Web Visualization
- Engineering File formats & Data Interoperability
- Mobile/Web Engineering Apps Development
- Quality Assurance/Testing services
Contact us:
3dmeasureup@prototechsolutions.com
3D Measure Up