2020

3D Measure Up 9633
Tutorial Blogs

Is there an Application Programming interface that takes body measurements?

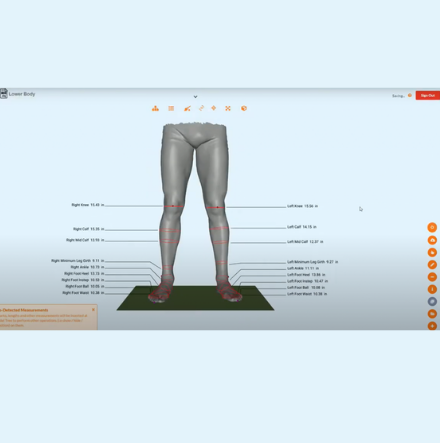
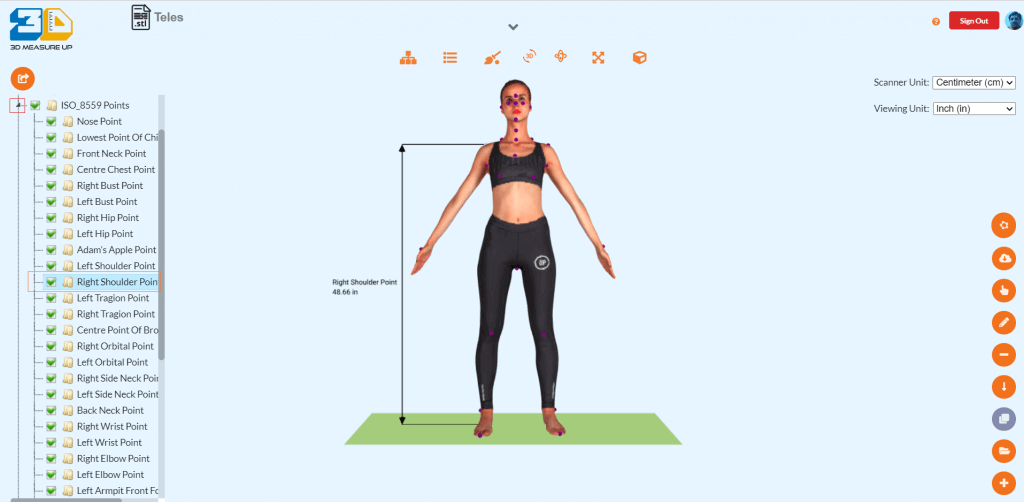
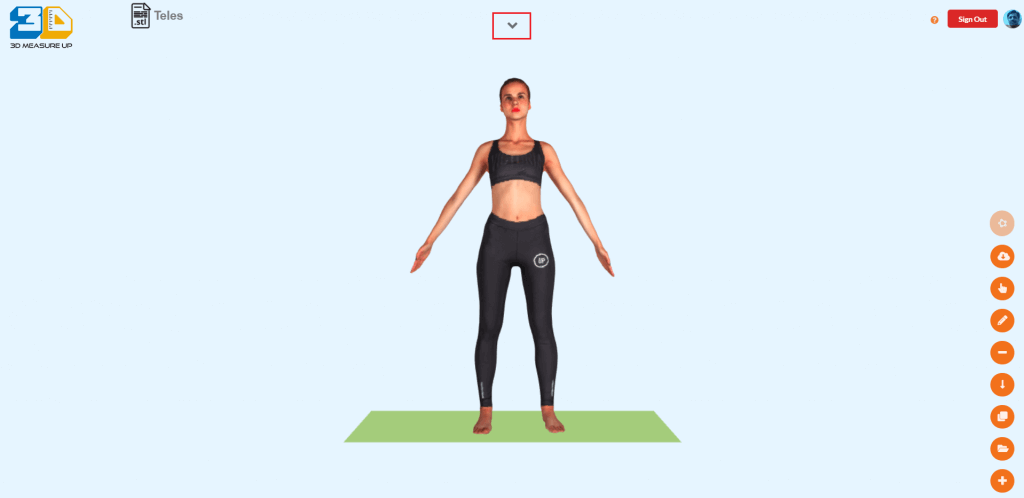
Is there an Application Programming interface that takes body measurements?- 3D Body Measurement App and Website 3-D body scanning has a new face, and increased accessibility could easily lead to a better fit and fewer returns. In the last few years, 3-D body scanning has developed from bulky machines to something that can be done with 2D pictures. With a few tabs, customers can now get access to precise body measurements without having to go to the store to get scanned and avoid contact measurements in this COVID period. 3D Measure Up provides customers with the ability to digitally give accurate human body measurement by converting 2D body pic to 3D scanned model. It's that easy, just with 2 images You can create a full body Avatar and Measurements with 2D Image/photo transformation with APP to convert a photo to 3D scan. Our Avatar 3D models are also available for free download in OBJ file format. Take a Free Trial today. Main Features For 3D Measure Up that makes us distinct Automatically detect and measure 100+ body landmarks. Measure distances, girths, heights, volumes etc. Make specific measurements that you need. Accurate and fast. We provide exact geometrical measurements Compatible with any 3D scanner. Takes 3D scan as input (OBJ/STL). Avatar and Measurements extraction from a Single photo. Export your measurements to CSV, PDF, HTML format. Web App with state of the art 3D Visualization and UI/UX. Uses unique combination of machine learning (ML) and geometric computations for landmark detection. Privacy and Confidentiality: Your data (3D scans) is always yours and used only for computing measurements. Works on any device – laptops, tablets, smartphones. Can be deployed on your own Cloud infrastructure. OEM version available for custom branding. PaaS – Integrate with your own app or service. Highly extensible and portable cloud API available.   Are you ready? To perform measurement operations on the model. To know more about the 3D Scanning Technology and Body Measurement API, please visit 3dMeasureup. Click here to signup for a free trial of A Body Measurements API, or contact us at 3dmeasureup@prototechsolutions.com. What's More? We have just released the full body avatars! Body measurement API,2D Pic to 3D scan,Automatic Body Measurements,Accurate size recommendation Author: Pankaj C. Contact us: 3dmeasureup@prototechsolutions.com 3D Measure Up
3D Measure Up 966`
Tutorial Blogs

Impact of different poses (Relaxed, ‘T’, And ‘A’ Pose) on Human Body Measurements

Impact of different poses (Relaxed, ‘T’, And ‘A’ Pose) on Human Body Measurements There are many more challenges related to postures,  one of the common ones is caused by fused body parts with  3D body scan when the subject is scanned in a relaxed posture. In such scans, there are two main areas where there is a major impact on mesh quality. The arms get fused with the torso. The fused mesh areas cause problems in the identification of armpit points and upper body features. In the lower body region, the meshes around the thigh region fuse with each other and adversely impact the identification of the crotch points and hence dependent measurements like inseams. These are exactly the kind of problems which the ‘A’ and ‘T’ poses to try to circumvent, but it creates its own set of challenges. For a comfort-fit garment, the measurements need to be taken in the pose that is the natural at ease posture of the person. Impact of standard ‘A’, ’T’ and relaxed poses on measurement A and T poses tend to make the person stand erect and raise the upper body especially the shoulders and the chest area.  The tables in this show the deviation in chest girth and back shoulder width in T pose, A pose, and a standing relaxed pose. As you can see, the deviation for chest girth can be as high as 6+% while for back shoulder width it can go up to 9%. Impact of standard ‘A’, ’T’ and relaxed poses We also studied the deviation of waist measurements when the subject is standing in relaxed pose - in ‘T’ pose waist measurements can be off by 8%. Bicep is another part of the body that can measure differently when the subject is in a relaxed pose - it also changes by upto 2%. Extracting body measurements in a relaxed pose  First, we identify the case of fused body features by using geometry algorithms. Once we identify these cases, the next challenge is to identify the boundaries of these fused parts.                                                                                                         Using ML techniques we identify the region of the body and get a context. After this, we locate the ‘pits’ in the mesh to finally get the boundaries.                                                                                                                                                                         We then extrapolate these boundaries ('Side Curve Computation') to form a closed curve which approximately models to human body shape. Following are examples of measurements on fused body parts: Fused Chest Measurement : Fused Waist Measurements : Fused Thigh Measurements : Here’s a quick video which shows the problem and solution. As you can see, in the upper body region the arms are fused with the torso and in the lower body region, the thighs are joined. After applying our fix, we are correctly able to get the chest girth and the crotch length measurements using  3D Measure Up. Measurement of human body parts,Comparison of measurement on different poses,Body measurement on relaxed pose,Body measurement on A and T pose 3D Measure Up Visualizer,Human Body Measurement OEM,Human body Custom measurement Author: Pankaj C. Contact us: 3dmeasureup@prototechsolutions.com 3D Measure Up
3D Measure Up 967
Tutorial Blogs

Architecture for applications built using the 3D Measure Up OEM Widget

Architectural View of 3D Measure Up-OEM Integration The suggested client architecture is similar to Micro Frontend Architecture. It can be assembled using UI components built using Angular/React/Vue or even simple jquery. The presentation layer will be implemented using HTML 5 and Bootstrap CSS. The 3D Measure Up widget will be embedded in the OEM Application Frontend. The 3D Measure Up Visualizer will communicate with the 3D Measure Up Cloud service to retrieve measurements and landmarks of the human body. The interaction between the OEM Application UI components and 3D Measure Up Visualizer will be via client API calls and events.  The above diagram illustrates the different components or subsystems of the application client. An OEM HTML5 based application addressing a use case like Tailoring or Fitness tracking. This application contains the OEM Application components and the 3D Measure Up OEM Widget.  The OEM Application components are suggested here to represent a typical use case. These illustrate the functions that may be required to enable the functionality in the application. These present the measurements and landmarks in the context of the use case. For example, if it is an application for Tailors it shows only the measurements relevant to the tailoring. For a fitness tracking application, it may store the information of the previous measurements in a database and show the differences in a table. The 3D Measure Up OEM widget contains the controls and UI elements to load, measure, and render the model with measurements. It provides access to the measurements and UI using APIs and callback functions. This is the Graphic UI of the Widget. The 3D Model is rendered along with the measurements and controls to manipulate measurements. The user can use the mouse to interact with the elements of the view. The 3D Measure Up widget can be initialized using configurations to control the look and feel of the UI. The configuration also enables limiting or hiding certain features that are not relevant to the user. The configuration is passed to the application at initialization in a JSON form. It can also be accessed and modified using the set and get methods exposed by the widget. The developer can register callback functions to process different events that occur in the widget. For example, the developer can pass a callback function to get a notification when the measurements are automatically generated. The 3D Measure Up widget also exposes API to set and get measurements. The application can retrieve automatically detected measurements along with measurements that are generated using custom landmarks of the human body . The 3D Measure Up widget exposes API to manipulate the widget’s view elements such as the zoom, show hide controls, show hide measurements, or refresh the view. The OEM Application retrieves the measurements from the 3D Measure Up widget and builds a component to display the relevant metrics in a tabular form or a grid form whichever is suits the usability. The measurement and landmark controller components are part of the OEM application. It allows the application to extend or override the metrics generated by 3D Measure Up. The OEM application can maintain proprietary algorithms for custom measurement ie. measurement whose definition is the intellectual property of the OEM business. The OEM Application may choose to represent the view manipulation controls differently than as defined in the 3D Measure Up widget. The controls can be displayed in HTML components and rendered anywhere on the page (even above the 3D Measure Up widget UI). The controls interact with the functionality of the widget using API.  These are controls similar to those in the above, except they may more gross functions like load model, clear the scene, etc. The communication between the OEM application and the 3D Measure Up service is handled by the 3D Measure Up widget. The OEM application handles communication with its backend. This keeps the two systems loosely coupled and allows independent evolution of the subsystems. Human body Landmark detection,Human body Automatic measurements The 3D Measure Up OEM makes it easy to develop applications for Tailoring workflows, Fitness Monitoring, Size Recommendations Widgets even Orthotics and Prosthetics. The 3D Measure Up widget has also enabled customers to build on the measurements extracted from the scan and extend them to derive custom measurements unique to their application. 3D Measure Up Visualizer,Human Body Measurement OEM,Human body Custom measurement Author: Pankaj C. Contact us: 3dmeasureup@prototechsolutions.com 3D Measure Up
3D Measure Up 9674`
Tech Blog

Advantages of Automated Measurements of Human Body

Advantages of Automated Measurements of Human Body Taking measurements of human body features is technically a scientific process since it involves observation and measurement  But for years it has evolved more into art than science. Anthropometric measurements, as they are called, require a high degree of workmanship and have a direct impact on the lives of the user. What’s more, this level of quality is required each and every time. This makes it an ideal candidate for automation.     Here is a list of some of the advantages of using automated measurements: Details: Get detailed measurements. With 3D Measure Up, you can measure far more landmark points on the foot than manual methods Accuracy: 3D Measure Up is highly accurate. It overcomes all the limitations and errors that are associated with manual measurements. Fast: Using 3D Measure Up drastically reduces the time required. It avoids needing visits to the clinic and is highly accessible. Simple: For manual measurements, you need an expert anthropometrist. 3D Measure Up can be used by anyone with very little training. Contactless: The entire process of scanning to measuring is contactless. This is very important for the safety and hygiene of patients and health care workers involved in the process. Economic: Manual measurements are very costly since it has a dependency on people and experts. With less than a dollar per scan, 3D Measure Up is extremely affordable. Scale: 3D Measure Up can be accessed from anywhere on any device which has access to the internet. This makes it possible to reach out to many more people who need it and scale up the operations. Automation: Since 3D Measure Up requires no manual intervention for extracting measurements, it can be incorporated in any automation process. At 3D Measure Up we believe that automation is more than faster production, cheaper labor costs, replacing hard, physical, or monotonous work. For us, it enables a great experience for as many people as possible enabling them to express their best.  It is our endeavor to assist researchers, designers, engineers, and craftsmen to collect accurate body dimensions for obtaining a good fit of a product for every user. The following links will help you explore 3D Measure Up further: How to load a model in 3D Measure Up Web Application How to align a model in 3D Measure Up Web Application How to automatically extract measurements from a 3D model How to use the measurement tree to show, hide, and export landmarks and measurements in 3D Measure Up Web Application How to extract measurements from scans of a legs Write to us at 3dmeasureup@prototechsolutions.com. We look forward to assisting you to produce a product that is a perfect fit. To know more about the Automatic Measurement App, please visit www.3dmeasureup.com. Click here to signup for a free trial of 3D Body Scanner, or contact us at 3dmeasureup@prototechsolutions.com Author: Pankaj C. Contact us: 3dmeasureup@prototechsolutions.com 3D Measure Up
3D Measure Up 9603
3D MeasureUp

Cloud connect – 3D Measure Up success story showcased

Cloud connect - 3D Measure Up success story showcased About Cloud Connect 2020 Cloud Connect 2020 event brings inspirational speakers, consumer success stories, business, and technology experts who will focus on discussing use cases and best practices. Be part of the innovators' network that will lead to cloud growth across conventional industries. 3DMeasureUp | Cloud Partner- AWS Meet the Industry Expert Mr. Rajesh Bhartiya, CEO- ProtoTech Solutions displaying Innovative Technologies and Cutting Edge application @Cloud Connect 2020 | Register The story of 3DMeasureUp- A Perfect Fit, our latest innovative offering.  Proud to share the success of our product and it’s story! Register today for a FREE plan! 3D Measure Up success story showcased Contact us: 3dmeasureup@prototechsolutions.com 3D Measure Up
3D Measure Up 9665
Tutorial Blogs

How to extract measurements from scans of a legs

How to extract measurements from scans of a legs How to extract measurements from scans of a legs 3D Measure Up supports both full and partial body parts for extracting measurements. This tutorial shows how you can use the Auto Measure feature to extract measurements from scans of legs or feet. You can load OBJ and STL 3D models in 3D Measure Up.  How to extract measurements Video 1: How to extract measurements of legs using 3D Measure Up web application   Video 2: How to extract measurements of legs using 3D Measure Up web application - II A. Log-in to the 3D Measure Up application. B. Load the model. Refer: How to load a model. C. Before you perform any operations on the model, align the model. Refer: How to align a model. D. After you align the model, press the Auto Measure Button from the operations toolbar. E. The 3D Measure UP application sends a request to the cloud service to extract measurements for the model. This may take a few seconds, depending on the network speed, the model size, the density of the model mesh. F. The most often referred measurements are marked and displayed on the model.   G. You can use the view controls to rotate, pan, and zoom into the model. The mouse actions are illustrated in the Help dialog. Click on the (?) button at the right top corner of the application to open the Help dialog. This video on Mouse controls also demonstrates how to use mouse controls. H. You can also view the list of measurements extracted in the measurement tree. Click on the Model Tree button on the view control bar at the top. The tree view is opened on the left of the view. I. Operations like hiding and showing measurements, export selected measurements, etc. can be performed from the measurement tree. They are described in the tutorial: “How to use the measurement tree”. A comprehensive list of landmarks and measurements can be found here. Contact us if you need additional landmarks or measurements for niche applications. To know more about the Measurement of human body parts and 3d body measurement software, please visit www.3dmeasureup.com/. Click here to signup for a free trial of A body measurement software, or contact us at 3dmeasureup@prototechsolutions.com Author: Pankaj C. Contact us: 3dmeasureup@prototechsolutions.com 3D Measure Up
3D Measure Up 21
Tutorial Blogs

How to use the measurement tree to show, hide, and export landmarks and measurements in 3D Measure Up Web Application

How to use the measurement tree to show, hide, and export landmarks and measurements in 3D Measure Up Web Application You can load OBJ and STL 3D models in 3D Measure Up. 3D Measure Up supports both full and partial body parts for extracting measurements. At present, automatic measurements are supported for full-body scans only. All the measurements and landmarks that are extracted automatically or manually are listed in the measurement tree left panel of the application. This tutorial shows how you can use the measurement tree to show, hide, and export the measurements. A. Log-in to the 3D Measure Up application. B. Load the model. Refer: How to load a model. C. Before you perform any operations on the model, align the model. Refer: How to align a model. D. After you align the model, you can extract measurements using the Auto Measure feature. Refer: How to extract measurements automatically. E. You can also use tools in the operations bar to extract custom measurements. Refer: How to extract custom measurements. F. The list of measurements extracted is organized in the measurement tree. Click on the   button on the view control bar at the top. G. The measurements tree groups the metrics in the following categories: Measurement Planes On Surface Lengths Straight Distances ISO 8559 points  Others   There are about 120+ metrics listed in the measurement tree. By default most often referred metrics are selected. H.  Common operations on the measurements and landmarks listed in the measurement tree. Rename Right-click on the measurement name in the measurement tree. A menu will appear with operations that can be performed on the measurement. Select Rename. The label turns into an edit box. Type the new name and press enter. The metric is renamed.   Delete Right-click on the on measurement name in the measurement tree. A menu will appear with operations that can be performed on the measurement. Select Delete. The metric is removed from the list. This operation can not be undone.   Hide/Show Click on the checkbox beside the metric to show or hide it in the view. To show or hide all the metrics of a category, check/uncheck the box besides the category. For example, turning off the checkbox beside the measuring planes node will hide all the girths displayed in the view.   Align The user might want to tune measurement or landmarks to suit the user’s needs. This option is available for girths and ISO 8559 landmarks. The Align operation allows the user to shift or rotate the landmark. The user can also increase or decrease the circumference or length of the metric. The video shared with the blog demonstrated how you can use the align operation. I. The “Others” node has the height and volume information. You might need to scroll to the bottom of the tree to find the Others node. Click on the arrowhead beside the Others label.   The Volume and Height of the scanned body are listed here. The units for the Volume and height are there viewing units. To set the viewing unit click on the Set Units button in the View toolbar at the top.   J.  3D Measure UP identifies all important landmarks listed in ISO 8559 - 1 specification. To view the list of the ISO 8559 landmarks, click on the arrowhead   beside ISO_8559 Points node in the measurement tree. Select the ISO 8559 Point from the list to view the landmark and list level from the ground. The following diagram shows the Right shoulder point and its level from the ground. The level or height is displayed in the viewing units.   A comprehensive list of landmarks and measurements can be found here. To know more about the 3d body measurement application and Accurate landmarks measurements, please visit www.3dmeasureup.com. Click here to signup for a free trial of A Body Measurements API, or contact us at 3dmeasureup@prototechsolutions.com Author: Pankaj C. Contact us: 3dmeasureup@prototechsolutions.com 3D Measure Up
3D Measure Up 260
Tutorial Blogs

How to load a model in 3D Measure Up Web Application

How to load a model in 3D Measure Up Web Application You can load OBJ and STL 3D models in 3D Measure Up. 3D Measure Up supports both full and partial body parts for extracting measurements. At present, automatic measurements are supported for full-body scans only. To load a model  A. Log-in to the 3D Measure Up application. B. Click on the  button at the right bottom of the application. C. Click on the Load model button  in the toolbar. D. The Load model dialog is shown.     E. Click on the select model icon to select the model   from the local drive F. Find and select the model file (OBJ or STL). Click on Open.   G. Click on the Load button to open the model.   H. It takes a few seconds for the model to be displayed.   I. Before you perform any operations on the model, align the model. Refer: How to align a model. You are ready to perform measurement operations on the model. To know more about the automatic body measurement platform and partial body measurement, please visit https://3dmeasureup.ai/. Click here to signup for a free trial of A Body Measurements API, or contact us at 3dmeasureup@prototechsolutions.com Author: Pankaj C. Contact us: 3dmeasureup@prototechsolutions.com 3D Measure Up
3D Measure Up 260
Tutorial Blogs

How to align a model in 3D Measure Up Web Application

How to align a model in 3D Measure Up Web Application- Human Body Measurements Simulator The accuracy of measurements depends on whether the model’s coordinate system is the same as that of the measurement system. A small misalignment ie. the model is looking slightly to the side, can introduce up to 8% error in measurement. You can either use the manual alignment tool or the auto-align feature. The auto-alignment feature uses intelligent algorithms to Auto-Alignment To automatically align a model A. Log-in to the 3D Measure Up application. B. Load the model. Refer: How to load a model. C. Click on the view controls button at the top. D. The view controls toolbar will be visible.   E. Click on the auto align model  icon to automatically align the model. F. A warning box appears. Before auto aligning 3D Measure Up clears all the measurements. Click on OK, if wish to continue without saving. G.  The application requests the 3D Measure Up API to align the model. This may take a few seconds. H. After aligning the model is repositioned and displayed in the view. You are ready to perform measurement operations on the model. Aligning the model manually To manually align a model A. Log-in to the 3D Measure Up application. B. Load the model. Refer: How to load a model. C. Click on the view controls button at the top. D. The view controls toolbar will be visible.   E. Click on the manually align model icon  F. A warning box appears. Before auto aligning 3D Measure Up clears all the measurements. Click on OK, if wish to continue without saving. G. The alignment control is displayed over the model. H. Use the green control to rotate the model along the vertical axis.   I. Use the red control to rotate the model along the horizontal axis parallel to the screen.   J. Use the yellow control to rotate the model along the axis perpendicular to the screen.   K. After you position the model correctly, click on the manual align button  L. The model is repositioned and displayed in the view. You are ready to perform measurement operations on the model. To know more about the accurate 3d body measurement application and its Body Measurement API Usage, please visit https://3dmeasureup.ai/. Click here to signup for a free trial of 3d Body Measurements API, or contact us at 3dmeasureup@prototechsolutions.com. Author: Pankaj C. Contact us: 3dmeasureup@prototechsolutions.com 3D Measure Up
3D Measure Up 01
3D MeasureUp

3D Measure Up @ 3DBODY.TECH Conference & Expo Nov 17-18, 2020

3D Measure Up @ 3DBODY.TECH Conference & Expo Nov 17-18, 2020 3DBODY.TECH Conference & Expo is a great conference. Participation by market leaders and trendsetters. Very well organized. Lot’s of very useful talks and takeaways. At 3Dbody.tech we will be discussing some of the challenges that we faced with 3D body scans that are not perfectly aligned. Also, we will discuss the impact of natural body postures on the automatic extraction of measurements. We will give a very high-level overview of our approach to overcoming these challenges. 3D Measure Up is a technology platform for 3D body landmark identification and measurement extraction. Our vision is to be a perfect fit in anthropometry space. We use a combination of computational, geometrical, and machine learning techniques to achieve very high fidelity in feature identification and a very high degree of accuracy in measurements. Feel free to connect with us at 3dmeasureup@prototechsolutions.com www.3dmeasureup.com Contact us: 3dmeasureup@prototechsolutions.com 3D Measure Up
Scroll to Top