Tutorial Blogs

3D Measure Up 02
Tutorial Blogs

Post processing – Recognizing that the ML and Computer Vision algorithms can fail – YES, we can be wrong.

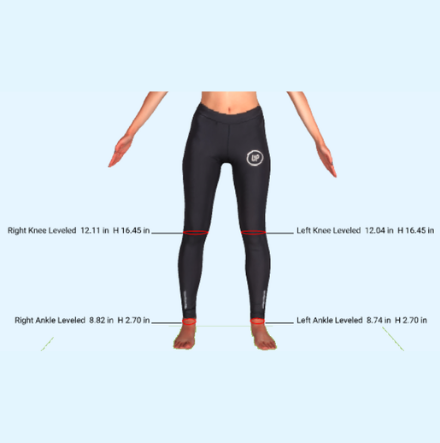
Post processing - Recognizing that the ML and Computer Vision algorithms can fail - YES, we can be wrong. Identifying body landmarks is not a perfect science. It’s a mix of anthropology, metrology, linguistics, geometry etc. With 200+ staff years of experience with developing this solution and talking to a number of people all over the globe, we have realized that we may still miss a certain landmark or measurement. The definition of certain measurements vary and are still debated. The input avatars may not be perfect. These are external factors that affect the measurement accuracy. There can never be an Artificial Intelligent system that we will be able to build that will be faultless. So one of the most important characteristics of an autonomous system is to be able to recognize its own mistakes. Talk about BEING HUMAN. - Gentry Lee on Limit of AI. https://www.youtube.com/watch?v=BkFBz4I5AL8   There are internal or platform reasons too. It is a complex system. Since we use Machine Learning in tandem with Computational and Geometric algorithms, the challenge for us is to identify and isolate the cases where we might have missed our landmarks or when we may not have gotten accurate results.  It could be because the scan pose is different from the ones we designed for or the body shape is different or the platform we host on had an issue with the floating points.    We may not be 100% right all the time, but we still have to make our system more reliable. The way that can be achieved is by knowing when we might have failed. We can validate the output of the system and filter out the anomalies to make it more dependable. 3D Measure Up platform has an alternate system to verify each measurement value for each request. The verification system discards measurements that are surely wrong. One of the validations is based on relative measurements, obvious comparisons like a. Foot length should be greater than Foot width b. Calf girth should be greater than minimum leg girth c. Hip  girth measurement should be greater than thigh girth   Similar validation can be done by checking the position of a measurement. For example a. Level of the calf girth is between the knee and ankle b. Foot waist is between Foot Instep and Foot Ball c. Waist is always between the Chest and Hip.     The other validations include checking the shape of the girth  We check the starting point of the girth is the same as the end point. For example  a. Whether the girth closes properly Incomplete girths could be caused due mesh defects such as self intersecting meshes.   But then 3D Measure Up can do this in a generic way that is common to all use cases. Another layer of validation by the developer or the end user can certainly be added to improve the reliability. 3D Measure Up API and WebAPP provides an option to export the result as a 3D HTML file that renders the avatar and the measurements in 3D in any standard browser. This 3D rendering is a great tool for visually verification of the output by the end user or the expert viz. Fashion designer, doctor or anthropometrist.    Click here to signup for a free trial of A body measurement software, or contact us at 3dmeasureup@prototechsolutions.com Know more about the Measurement of human body parts and 3d body measurement software Verification of measurement system Avatar 3d view Measurements for niche applications Body Measurement Technology Contact us: 3dmeasureup@prototechsolutions.com 3D Measure Up
Tutorial Blogs

Take measurements and Share them. Not just the spreadsheet, but in full 3D

Take Measurements And Share Them. Not Just The Spreadsheet, But In Full 3D You would expect a 3D Measurement API to be a simple bland affair – you pass the avatar and get the measurements in an array or a spreadsheet which in turn you pass it on to your customer. Well, it doesn’t have to be. You can make it very very interesting. The 3D Measure Up Web API now has an option to return a full 3D view of the avatar with annotated measurements. This is returned as a normal HTML (.html) file which can be viewed in any browser or embedded in any web page and does not require internet connection. Yes, it does not require any internet connection because none of the data including the avatar and the measurements are on our server – it’s all included in the HTML file itself which you have full control over. This feature extends the current measure API by adding an additional parameter “exportHTML” to the request body. The expor tHTML is false by default. When set true, the metrics response contains an attribute “downloadHTMLURL”. The download URL is a signed URL. It is valid for 1 hour. The application can download the self contained HTML file and load it in the browser. Since the HTML is self sufficient, it can be loaded from a local drive without the need of a web server. Verification of measurement system Avatar 3d view Measurements for niche applications Body Measurement Technology A sample request sequence will be as below. a Request to start extraction of measurements URL: https://api.3dmu.prototechsolutions.com/v3/models/measure Request Method: POST Authorization Header: x-api-key: API key Request body: {     "type": "all",     "fileurl": "https://3dmu-app.prototechsolutions.com/resources/models/bernard.obj",     "auto_align": true,     "filesource": "url",     "filetype": "obj",     "output": "json" "export_HTML": true, "ids": [127, 144, 108, 125, 126, 121, 123, 109, 110, 113, 117] } Expected response: {     "statusCode": 200,     "requestId": "d0f17b30-3529-11eb-98f5-a3ea69d792ff" } Request to retrieve the measurements URL: https://api.3dmu.prototechsolutions.com/v3/models/metrics?requestId=<request id value from the /measure API response>  eg: https://api.3dmu.prototechsolutions.com/v3/models/metrics?requestId=d0f17b30-3529-11eb-98f5-a3ea69d792ff  Note: The requestId value above will be different with each request to the /measure call. Request Method: GET Authorization Header: x-api-key: API key Expected response: {     "statusCode": 200,     "body": {         "result": {             "metrics": {                 "girths": [                     {                         "id": 101,                         "label": "Head Start",                         "girth": [],                         "level": 1898.9337258724686,                         "confidence": 0                     }, ... … } "bodyType": “Fullbody”, "downloadHTMLUrl": "https://3dmu-development-space.s3.ap-south-1.amazonaws.com/ExportedHTMLs/d384ef60-c9aa-11eb-8223-f5ad6cd811da.html?X-Amz-Algorithm=AWS4-HMAC-SHA256&X-Amz-Credential=ASIA2VKJASSLZJQ6KXM5%2F20210610%2Fap-south-1%2Fs3%2Faws4_request&X-Amz-Date=20210610T051509Z&X-Amz-Expires=3600&X-Amz-Security-Token=IQoJb3JpZ2luX2VjEOX%2F%2F%2F%2F%2F%2F%2F%2F%2F%2FwEaCmFwLXNvdXRoLTEiRzBFAiB6w15DbERms5IAJ5XPNS89WynCf8bIlrKy5ZMosWEjZQIhAJSIrspogJ3wp5RQrUXnpVU7%2BC01A7LU96kdPbn0V0VdKp8CCJ7%2F%2F%2F%2F%2F%2F%2F%2F%2F%2FwEQAhoMNzMyOTgxOTI1MDE1IgwwE39PFWL4QcLcoo4q8wELYmX%2Fq2IEUFZzzDuhkQXMym%2FNg6SSkxkvAoiQdsfbO4q8rolPX1EoX7agjaEVh2R0EO9kksoOPrAHx1wJyJGoHUFWdJKrChMFBjS95Qvcz91iKr0SKP%2FXrG283F2iLkvlkQEHuM5r%2Bxl3E%2BARGy%2Bvb4ZSfb8hcecsu91lA3BKIU9GgbksRjJ6OIl3xUQrpkVXXZZxBlRC4RJLE%2BolVvDyBFZeQLD8WEh%2FvImHzKCyLG%2FznQyH%2BRBQ3szblr1LgjuT5guzWuBchxa8UN2QEaXr8Nw%2F3toampevHM04iZFKq65x2rUWdVNBm%2FQBwgMvMdAqmYww0r6GhgY6mgE4UdaDMfT6dNwT5pqTn8N4wOahFSsTgiqtMl23GStGSRXvFr4G0AVd3%2F1JOhQjjxRGFRj45ccOuMYCvn2GlyaXV2taZVp2zE2me2Zy3GOpGUr4akQoAYYcAc2HwyQqfffGuOkDr0FI9J4C%2Buf3jGcKuskMZAk5TSxOOs0q1EbfJDNFpH0naBdCLYYmrIPRNDSE3KCbdHGLxJOB&X-Amz-Signature=e2bbb8d2ff2ae1826d21354fb77587443b80fd57cd19c575528f0ed74bc2fb49&X-Amz-SignedHeaders=host" ... } The downloadHTMLURL can be used to download the HTML file locally or on a HTTP endpoint. Feature constraints The alpha version of the feature has the following constraints. The HTML export is supported for avatar size less than or equal to 20mb The maximum number of measurements exported to the HTML file is 20. The ids of the measurement can be specified in the request. All ids should be valid. The ids can be referred from the metrics guide application on metrics.3dmeasureup.com If ids are not provided, measurements of the following ids will be returned[105, 106, 107, 108, 113, 114, 115, 116, 117, 118, 121, 122, 123, 124, 125, 126, 140, 141, 142, 144];The typical ids of metrics required for a apparel use case are:[ 127, 301, 302, 329, 303, 144, 315,316, 108, 325, 326, 125, 126, 121,123, 109, 110, 309, 113, 117 ] HTML download URL is valid for 1 hour The alpha version exports only girths to the HTML format To export html the type attribute of the measure request should be  “all”. Ie, “type”: “all” The export HTML feature is an API that enables the developers and designers to quickly verify the results. The HTML presents a 3D view of the measurements on the avatar and can be used as a preview in applications integrating the 3D Measure Up.  For more visual, interactive and customizable we recommend using the 3D Measure Up OEM widget. Contact us: 3dmeasureup@prototechsolutions.com 3D Measure Up
3D Measure Up 09
Tutorial Blogs

3D Measure Up version 4.5 – Effortless to browse, easy to compute, verify Measurements!

3D Measure Up version 4.5 - Effortless to browse, easy to compute, verify Measurements! Our new app is here! A brand-new utility app for 3D Measure Up users and developers! What makes the product different is, this app makes it simple to browse, search, and filter the definitions of human body measurements supported by 3D Measure Up, complete with illustrations. New Features Added A new utility application can be accessed from here. Web API 3D HTML Export (alpha): The Web API now allows you to export the measurements as well as the avatar's 3D view.  This 3D HTML can be viewed in any browser or embedded in any web page, and no internet connection is required. Request Format:   The image below shows how the downloaded HTML file is viewed in the browser Enhancements Improved Accuracy: Belly Button (ID: 237)  Abdomen Point (ID: 238)  Waist Circumference (ID: 163)  Navel Girth (ID: 168)  High Hip (ID: 156)  Maximum Hip (ID: 166)  Hip (ID: 167)  Total Crotch Length (ID: 307)  DevOps: Implemented a multi-layered regression test system early in the development process to detect unintended changes in measurements. Fixes Web API:   Additional measurements were returned in the Measure API response, in addition to the ones requested using the "ids" parameter. Over 200 measurements are accurately measured by the 3D Measure Up platform from 3D body scans of people standing in A, T, or relaxed positions.  To make it more accessible, the 3D Measure Up platform includes: 1. Web API 2. Web Application 3. OEM widget This version of 3D Measure Up attempts to make the measurements more verifiable. A comprehensive list of landmarks and measurements can be found here. Please contact us if you need additional landmarks or measurements for niche applications. To learn more about measuring human body parts and 3D body measurement software, go to www.3dmeasureup.com/. Click here to signup for a free trial of A body measurement software, or contact us at 3dmeasureup@prototechsolutions.com To know more about the Measurement of human body parts and 3d body measurement software, please visit www.3dmeasureup.com/.  Verification of measurement system Avatar 3d view Measurements for niche applications Body Measurement Technology Contact us: 3dmeasureup@prototechsolutions.com 3D Measure Up
3D Measure Up 16
Tutorial Blogs

3D measure Up version 4.4 – The Apparel Industry’s Most Critical Metrics!

3D measure Up version 4.4 - The Apparel Industry's Most Critical Metrics! With the rise of Ready-to-Wear apparel, businesses require several measurements to create digitally fit ideal apparel. The majority of the essential metrics for the Apparel business are covered in this release. New Features Added: Landmarks- At the navel- Belly Button (ID: 237) ~2 inches above the navel- Abdomen Point (ID: 238) Girths Max girth on the biceps: Left Biceps Max Girth (ID: 164)  Right Biceps Max Girth (ID: 165) Max girth on the Forearm: Left Forearm Max Girth (ID: 151)  Right Forearm Max Girth (ID: 152) From front view, horizontal circumference taken at narrowest torso point, between chest and hips- Narrow Waist (ID: 155)  Narrowest circumference between, the higher of the 2 elbow heights and the belly button- Abdomen (ID: 161)  Narrowest circumference between, the average of elbow heights, down to 2 inches below that point- High Waist (ID: 162)   Waistband, a fixed circumference starting at the Small of the Back point and descending at fixed 10 degree angle to the front point- Waist Circumference (ID: 163)  Horizontal girth passing through Belly button- Navel Girth (ID: 168)  Girth at the average of the seat level and the front abdomen landmark- High Hip (ID: 156) Max horizontal girth below the hip level- Maximum Hip (ID: 166)  Girth at Hip level i.e. Level of greatest projection at the back- Hip (ID: 167) Girth on the Thigh 2 inches below the Crotch Point: Left Upper Thigh (ID: 153)  Right Upper Thigh (ID: 154)  Circumference taken at the averaged height of both knee caps- Right Knee Leveled (ID: 157)  Left Knee Leveled (ID: 158)  Circumference taken at the averaged height of both ankle bones- Right Ankle Leveled (ID: 159) Left Ankle Leveled (ID: 160) Lengths- Across Back Tape measurement (ID: 345)  Horizontal measurement between the armpits, along the back- Back Shoulder Width Horizontal (ID: 346)  Sleeve length or measurement between the Back Neck Point and the Wrist Point(tape passes via back neck point, shoulder point, elbow, up to the wrist)- Back Neck Point to Left Wrist Length (ID: 347)  Back Neck Point to Right Wrist Length (ID: 348)  Enhancements: Girths returned in API responses have been increased from 2 to 6 digits, after the decimal point. Removed confidence and girthConfidence parameter from API response. Added specific status messages, in status division, for different features in the application. ISO points: Crotch Point (ID: 236)  Left Armpit Front Fold Point (ID: 228) Right Armpit Front Fold Point (ID: 229)  Left Armpit Back Fold Point (ID: 230)  Right Armpit Back Fold Point (ID: 231)  Back Neck Point (ID: 219)  Girths: Crotch (ID: 110)  Right Mid Thigh (ID: 112)  Left Mid Thigh (ID: 111)  Chest (ID: 105)  Neck (ID: 140)  Surface Lengths:  Right Side Pant Inseam (ID: 335)  Left Side Pant Inseam (ID: 336)  Right Side Pant Inseam Upto Ankle (ID: 343)  Left Side Pant Inseam Upto Ankle (ID: 344)  Scye Depth Length (ID: 308)  Back Neck Point To waist (ID: 309)  Back Neck Point To Left Bust Point (ID: 317)  Back Neck Point To Right Bust Point (ID: 318)  Back Neck Point To Waist Level Left (ID: 319)  Back Neck Point To Waist Level Right (ID: 320) Back Neck Point To Knee (ID: 327)  Back Neck Point To Ground (ID: 328)  Fixes Web Application: Saving responses in the client cache. Repositioning of reference point outside the girth, in Girth Profile tool. Web API: Left/Right Foot Length and Foot Width missing in API response. Over the last 6 months, 3D Measure Up platform has accurately processed more than 10,000 scans. 3D Measure Up is being used in a number of production environments including making Bespoke suites, orthotics and fitness tracking applications.  A comprehensive list of landmarks and measurements can be found here. Contact us if you need additional landmarks or measurements for niche applications. To know more about the Measurement of human body parts and 3d body measurement software, please visit www.3dmeasureup.com/. Click here to signup for a free trial of A body measurement software, or contact us at 3dmeasureup@prototechsolutions.com Here is the link to a video showing many features. Body measurement landmarks Measuring the body for apparel design 3D Measure Up Latest Release Landmark-based measurement Contact us: 3dmeasureup@prototechsolutions.com 3D Measure Up
3D Measure Up 33
Tutorial Blogs

Measurements of the Thoracic Region

Measurements of the Thoracic Region This blog illustrates the different chest measurements extracted from a 3D scan. At present, a full body scan is required for extracting these measurements. Chest measurements are crucial for making patterns for suits, ladies garments, t-shirts, shirts and jackets, for men and women. They also play an important role in size and fit recommendations. The shape of the body can be determined by accurately measuring the torso.  To enable the designer to make accurate cloth patterns, 3D Measure Up offers more than 50 measurements in the Thoracic region (from the Neck to the Hip) that are horizontal, aligned to the skeleton, contoured and measured by tape. Landmarks Name Definition Image Centre Chest Point Point on the union of the third and fourth sternebrae, in the mid sagittal plane Right Bust Point Anterior most point on the right bust Left Bust Point Anterior most point on the left bust Left Shoulder Point Most lateral point of the lateral edge of the spine of the scapula, projected vertically to the surface of the skin, on the left side of the body, seen from the front Right Shoulder Point Most lateral point of the lateral edge of the spine of the scapula, projected vertically to the surface of the skin, on the right side of the body, seen from the front Left Armpit Front Fold Point Front fold point of the armpit on arm syce line determined using a scale place under arm on the left Right Armpit Front Fold Point Front fold point of the armpit on arm syce line determined using a scale place under arm on the right Left Armpit Back Fold Point Back fold point of the armpit, on arm syce line, determined using a scale place under arm on the left Right Armpit Back Fold Point Back fold point of the armpit on arm syce line determined using a scale place under arm on the right Belly Button/ Navel Point Point at the navel or the belly button Girths or Circumferences Name Definition Image Neck Girth of the neck at the point just below the bulge at the thyroid cartilage and measured perpendicular to the longitudinal axis of the neck Neck Base Girth of the base of the neck measured over the back neck point and the front neck point Shoulder Horizontal Girth passing at the shoulder level over the deltoid muscle. Chest Horizontal girth at the Armpit level Under Bust or Chest end Horizontal Girth at the level just below the bust Belly Horizontal girth at the level of the navel Waist Circumference Horizontal girth at the level of the waist. Waist is the narrowest part of the torso, when viewed from the front Chest Girth (Aligned to Skeleton) Girth aligned to the skeleton at the level of the armpits. Bust Horizontal girth at the level of the bust points Lengths Name Definition Image Left Shoulder Length Distance between the Side neck point and the shoulder point Right Shoulder Length Length along the surface between the Side neck point and the shoulder point Back Shoulder Width Length along surface of the body between the shoulder points Left Shoulder-Underbust Length along surface on the front side of the body from the left shoulder point to the underbust level on sagittal plane passing through the left bust point Right Shoulder-Underbust Length along surface on the front side of the body from the left shoulder point to the underbust level on sagittal plane passing through the left bust point Underbust-Hip Length along surface on the front side of the body from the point on the mid-sagittal plane at the underbust level to the point on the mid-sagittal plane at the hip level Scye Depth Length Length along surface on the back side of the body between the back neck point and the center of the chest Back Neck Point To Waist Length along surface on the back side of the body from the back neck point to the point on the mid-sagittal plane at the waist level Front Neck Point To Waist Length along surface on the front side of the body from the front neck point to the point on the mid-sagittal plane at the waist level Left Side Neck Point To Bust Point Length along surface on the front side of the body from the left side neck point to the left bust point Right Side Neck Point To Bust Point Length along surface on the front side of the body from the left side neck point to the right bust point Left Side Neck Point To Waist Level Length along surface on the front side of the body from the Left side neck point to the point on the sagittal plane passing through the left neck point at the waist level Right Side Neck Point To Waist Level Length along surface on the front side of the body from the right side neck point to the point on the sagittal plane passing through the right neck point at the waist level Back Neck Point To Left Bust Point Length along surface on the front side of the body from the back neck point to the left bust point Back Neck Point To Right Bust Point Length along surface on the front side of the body from the back neck point to the right bust point Back Neck Point To Waist Level Left Length along surface on the front side of the body from the back neck point to the point at the waist level on the sagittal plane passing through left bust point Back Neck Point To Waist Level Right Length along surface on the front side of the body from the back neck point to the point at the waist level on the sagittal plane passing through right bust point Front Chest Width Length along surface (contoured) from between the front armpit poins Back Chest Width Length along surface (contoured) from between the back armpit poins Right Side Neck Point
3D Mea7ure Up 70
Tutorial Blogs

What new 3D Measure Up features have been added to the already impressive list? What are the solutions?

What new 3D Measure Up features have been added to the already impressive list? What are the solutions? 3D Measure Up's team is continually updating their product in order to meet the needs of their customers. The cool new features and enhancements are now available. Let's take a quick look at them. Tape measurements for all girths: A tape measure is a tool that uses tape and is commonly used in the clothing industry. Contoured is along the path on the surface of the body. These are typically used for functional clothing. In this release, each girth measurement is available as a tape measure and a contoured measurement. Both contoured and tape girth measurements of the chest are shown in the photos below:         a. Contoured Chest Girth         b. Tape Measure for Chest Girth New girth measurement “Aligned to the skeleton”: The girth axis may be aligned to: 1. The skeleton of the body OR 2. It may be perpendicular to the floor Girths on the arms, legs, and feet are always aligned to the skeleton. 3D Measure Up offers both girths on the head, neck, and torso regions. Enhancements and Fixes: Landmark points Updated 1. Improved positioning of chin point on obese body scans 2. Improved accurate positioning of bust point on obese body scans Girths Updated Renamed Chest End girth as Underbust. Surface Lengths Updated Redefined Total Crotch length as a tape measurement Added Total Crotch contoured length Enabled webhook to report errors during measurement extraction. For UI: Modified the button icon for the Clear Scene operation Added functionality to ‘Delete Measurement’ using, the context menu on measurement selection Usage Tip for every operation is minimized and accessible during the operation Re-positioned Search box and export button on the Model tree Renamed landmarks node in the Model tree to POINTS All ‘contoured girths’ are hidden by default, to reduce clutter The escape key exists current operation Height annotation visible on exiting the current task using the Esc key Resolved, delay observed in the show - hide measurement functionality using the context menu on measurement selection Fixed issues in model upload for models with model Names containing multiple dots Fixed performance issues with reloading of the model tree Measurements Improvements: Hip or Butt girth was not identified correctly for some models. 3D Measure Up key features- Auto Landmark Detection (ISO 8559) Measures distance, Girths, and Volume Highly extensible and portable cloud API Build your own branded application Measurements at user-specified location Partial Measurement Machine Learning is integrated Compatible with any 3D scanner Works on the Web Here is the link to a video showing many features. Precise Measurement on obese body scans Virtual body measurement software 3D Scanner Measurement software Up-to-date Measurement technology platform   Contact us: 3dmeasureup@prototechsolutions.com 3D Measure Up
3D Measure Up 119
Tutorial Blogs

What can 3D Measure Up do for you? Your vacuum, dishes, laundry…? Not yet, but for now…

What can 3D Measure Up do for you? Your vacuum, dishes, laundry…? Not yet, but for now... 3D Measure Up helps you accurately identify landmarks on objects and provides hundreds of measurement parameters viz. distances, girths, heights, surface areas, volumes etc. We are primarily set to work on 3D scans of the human body (full or partial), but the core technology is extensible to any object or shape. We have taken some very special measures using a combination of computational, geometrical, and machine learning algorithms to give you very accurate results. 3D Measure Up extracts about 130+ unique measurements from a 3D scan of a human body. The measurements can be : 1. Landmark points 2. Surface Length 3. Straight Lengths 4. Girths or Circumferences 5. Free-Fall lengths 6. Custom Measurements Landmark Points These are clearly defined points on the body that can be used for defining anthropometric measurements. They are described by their level from the ground and position in the 3D World. Some of the common landmarks are illustrated below:                                      a. Center Neck Point                                                                                          b. Left Side Neck Point.   c. Crotch Point Surface Length Surface length is the distance between two points on the body measured along the surface of the body.                                                                                                  d. Back Neck Point to Knee Length                                                              e. Outer Arm length Straight Length Straight length is the straight line distance between two points on the body. It ignores the body shape and surface. They are useful for applications like prosthetics. Straight distance between the chin and base of the neck (f. Straight Length demonstrating the distance between chin and the base point of the neck.)                                                                        f. Straight distances along the arm                                          g. Straight distance between the shoulder and wrist. Griths or Circumferences Girths are circumference measures at standard anatomical sites around the body, measured with a tape measure. Girth measurements can be used in determining body size and composition, and to monitor changes in these parameters.                                     h. Girth at neck end.                                                                           i. Chest Girth. j. Waist Girth Difference between Parallel to Ground and Aligned to the Skeleton Girths The girth axis may be aligned to the skeleton of the body or it may be perpendicular to the floor. Girths on the arms, legs, and feet are always aligned to the skeleton. 3D Measure Up offers both girths on the head, neck, and torso regions. (k. Girth measurement aligned to the body/skeleton.)                                      k. Girths Aligned to the skeleton                                                  l. Girths Parallel to the Ground/Floor Difference between Tape and Contoured Girth measurements A tape measure is using tape, these are typically used for regular apparel applications. Contoured is along the path on the surface of the body. These are typically used for functional clothing. The images below show both contoured and tape girth measurements for the chest:         m. Contoured Chest Girth         n. Tape Measure for Chest Girth The following table shows the different types of girth measurements along the human torso, their difference in measured values, and the way the measurement is extracted. The figures in red are measured values for the 3D Measure Up’s demo model. Free-Fall lengths Free-Fall length is the length of the trajectory followed by a dewdrop starting at a point on the body and flowing down the body by effect of gravity. This is useful when we like to do such a measurement for cloth which involves partial measurement on the body surface and partially hanging down freely. Back Neck point to the ground                                                        From a point on the waist to the ground                                                                                       o. Free fall length Custom or User-defined measurements 3D Measure Up attempts to cover most use cases. But there are some measurements that have not been incorporated yet. Some measurements could be proprietary to the user or organization. To accommodate such scenarios 3D Measure Up offers tools to
3D Measure Up 406
Tutorial Blogs

Requirements for Accurate measurements

Perfect | Accurate Automatic body Measurements Requirements for Accurate measurements 3D Measure Up makes the best effort to identify landmarks from scans of people in different poses and scans of varying quality. Having said that, for accurate and reliable measurements required for MTM or bespoke applications, we recommend the following: 1. Mesh Quality: A good quality mesh received from the scanner will yield better results. The expected mesh has the following qualities: a) It is a single, triangular mesh. b) It has watertight mesh i.e. no holes. c) It has no stray triangles or disjoint meshes. d)  It has no broken mesh or self-intersecting meshes. These occur usually on parts of the body with folds. Eg. armpits, crotch, elbows, back of the knee, the web between the fingers. e)  It has no platform below the feet, attached to the scan.         f)  Avoid fused body parts.              2. Pose: Though 3D Measure Up can handle any pose, the 'A' pose is ideal - the model standing with arms straight and pointing downwards. Fig: Model standing with arms straight and pointing downwards. 3. Alignment: A perfectly aligned model (no leans, no stoops) with '+Y' along the height of the person is ideal. Having said that, 3D Measure Up has inbuilt capability to correct alignment. Fig: Perfectly aligned model. 4. Mesh Size: Having said that, it is our observation that mesh size between 7MB to 12MB yields enough precision for most of the general applications. Beyond 12MB, the impact on performance may not be worth the increase in precision. Though you may want to validate this specifically for your requirements. Fig: Mesh size between 7MB to 12MB. 5. Clothing, hair styling, and other accessories: The clothes should be tight-fitting to get accurate measurements. Accessories straying out of the body surface or altering profile are best avoided. Hair should ideally be tied and tucked neatly as close as possible to the head. Fig: Model for clothing, hair styling & other accessories. Accurate body measurements Scan a person in 3D 3d scan landmarks Requirements for reliable measurements Accurate measurement app Contact us: 3dmeasureup@prototechsolutions.com 3D Measure Up
3D Measure Up 967
Tutorial Blogs

Body scan at home. Get your 3D avatar using a smartphone. Get 100+ measurements!

Body scan at home. Get your 3D avatar using a smartphone. Get 100+ measurements! fig: body measurements using phone camera The pandemic has forced everyone to remain indoors. While we still need to buy things for a living. Most of us are now used to re-ordering almost everything viz. Grocery, Meals, Kitchenware, and most importantly apparel. The biggest pain with apparel though is the hit and miss game that we have to play with the fitting. We end up returning more than half of the clothes, shoes, and other fashion items that we buy online. Why so? Most of it because it is not the right fit. And we know - returns are not pleasant at all. But finally, here’s some help from the technology. Handheld hardware scanners are on the rise and getting into the hands of more and more people - New generation Apple devices such as iPad Pro 12 already have a LiDAR sensor which does a decent job of capturing the world in 3D.  On the software side, there is extensive research and development done on converting 2D photos to 3D scans. The application of computer vision, image processing, and machine learning has greatly enhanced the fidelity of this conversion. In this blog, we demonstrate how to use the iPhone 12 Lidar scanner to get a 3D scan of a person and use it to extract human body measurements using ProtoTech’s 3D Measure Up. We used the 3D Scanner App and iPhone applications to get the scan of the person. It can be downloaded from this link: 3D Scanner App: https://apps.apple.com/us/app/3d-scanner-app/id1419913995   Configuring the app before taking the scan We set the following parameters in 3D Scanner App before starting the scanning process: 1. Resolution:- 9mm  2. Masking:- Person 3. Range:- 0.5 m 4. Confidence:- High   Steps or recommendation for scanning a human body: Two persons are involved in the scanning process. One who is getting scanned and another person to do the scan. Instructions for the person being scanned: 1. Stand in an A posture ie. with feet about 30 cm apart and the arms are way from the body. See the image below: 2. Stands still during the scanning. It takes about 3 to 4 minutes at maximum to generate the scan.   Instructions for the person generating the scan: 1. Holds the iPhone firmly such that the phone is vertical ie. at a 90-degree angle with the ground at all the time. This is necessary for accurate mapping of the body. 2. Keep the iPhone at a fixed height and move around the person to be scanned in a circle and the person being scanned is standing at the center. 3. It is recommended to perform the scanning more than once at the same height. 4. Start scanning at a level of height of the person and gradually decrease the height of the scan after completing one or two circular rounds at the same height. 5. Repeat this till you reach the ground and the entire body is covered. 6. Once the scan is completed. Smoothen the scan from available options in-app.     Export the OBJ/STL file There are multiple options available to share the scan. We exported the OBJ file through Email. There is also an option to store the scan in the device storage.    Using 3D Measure Up to extract measurements from the scan Transfer the scan obj file to your desktop.  Load it in 3D Measure Up to extract the measurements. The following links will help you to get started with the 3D Measure Up Web Application Quick introduction of 3D Measure Up Getting Started with 3D Measure Up How to load a model in 3D Measure Up Web Application How to align a model in 3D Measure Up Web Application How to automatically extract measurements from a 3D model How to use the measurement tree to show, hide, and export landmarks and measurements in 3D Measure Up Web Application   While accessing the 3D Measure Up application for the first time, you will be requested to sign up.  3D Scanner Application, iPhone lidar to measure the person, Extract human body measurements, iphone 12 lidar scanner and measurement, Iphone lidar measurement, Author: Pankaj C. Contact us: 3dmeasureup@prototechsolutions.com 3D Measure Up
3D Measure Up 5644
Tutorial Blogs

Remove the floor/platform at the bottom of the scanned model

Remove the floor/platform at the bottom of the scanned model A common problem with scanned models is the platform at the base of the model. The platform causes inaccuracies in the measurements and alignment. This blog enlists the steps to remove the platform at the base of the scanned model using Autodesk Meshmixer. Mesh Mixer is a free software for working with triangular meshes. You can read more about Meshmixer and download it from www.meshmixer.com. Once you have installed Meshmixer on your machine. Steps to remove the floor at the bottom of the scanned mesh: Right-click on the file name of the scan file. Select Open with and then Mesh mixer. After the model is loaded, Align the model such that it is facing the screen. From the left control bar, select Edit. A menu with edit operations will popup. Select 'Plane cut'. A Plane Cut dialog will popup and a control widget will float over the model. On the control, widget find a (W) icon. Click on it. The blue and red arrows will flip. Click and drag the Red triangle between the green and blue arrows. This moves the Cut Plane. Move the cut plane down such that it matches the floor level. Release the mouse button when the Cut plane matches the floor level. The floor mesh is removed and the mesh is closed at bottom of the foot. Click on the export button to save the model on the local drive. Meshmixer cut model,3d scan editing software,Mesh healer Autodesk Meshmixer,Measurement on 3d scanned model,Healing scanned model. Author: Pankaj C. Contact us: 3dmeasureup@prototechsolutions.com 3D Measure Up
Scroll to Top